How to Change Where Screenshots Are Saved on Your Mac - MacRumorsOpen MenuShow RoundupsShow Forums menuVisit ForumsOpen Sidebar
Skip to Content

How to Change Where Screenshots Are Saved on Your Mac

by

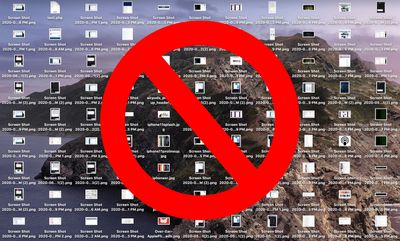
When you take a screenshot on your Mac – using the Shift-Command-3 shortcut to capture the whole screen, or Shift-Command-4 to capture a portion of it – the image files are saved straight to your desktop. This can result in this:

no screenshots
If you'd like to change that default save location to somewhere different, simply follow the steps below.

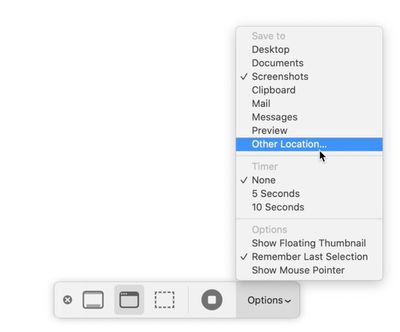
If you're running macOS Mojave or later, you can press Shift-Command-5 to invoke the screen capture panel, click on Options and choose "Other Location" to choose a destination.

options

For versions of macOS prior to Mojave, you'll have to follow these instructions:

How to Change Where Screenshots Get Saved on Mac (Prior to Mojave)

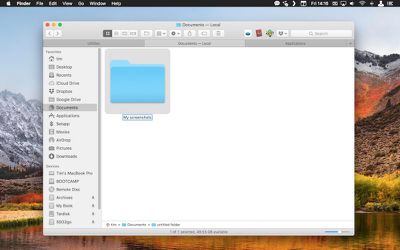
  1. Open a Finder window and press Shift-Command-N to create a new folder where you want your screenshots to be saved, and give the folder a recognizable name.
    screenshot save location 1

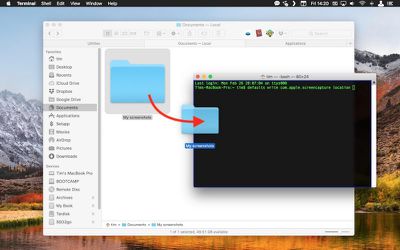
  2. Launch the Terminal app (found in Applications/Utilities).
    terminal

  3. Type in the following command and then press the spacebar, but don't hit Enter just yet: defaults write com.apple.screencapture location
    terminal

  4. Now drag the folder you just created into the Terminal window. The folder's path should appear after the command you typed in. Press Enter.
    screenshot save location 2

Your captured images will now be saved in the designated folder whenever you use the screenshot shortcuts.

Important note: Do not delete this folder until you've changed the save location to somewhere else using the same Terminal command, or you'll run into issues. If you want to switch things back in future so that images are saved on your desktop again, simply input the Terminal command as above, but change the path to ~/Desktop.

Top Rated Comments

78 months ago
In Catalina, Shift-Cmd-5, click Options, choose Other Location. Sticky setting.
Score: 9 Votes (Like | Disagree)
darkpaw Avatar
78 months ago
Couple of issues with this. If you're writing out steps, they really need to be correct, or you end up confusing the user, someone who may never have used Terminal before.

Step 1: You don't need to click the folder's name, because when you press Shift + Command + N, the folder's name is already highlighted for editing. Also, you can always just press Enter to rename a file.

Step 3: Be sure to tell the user to add a space at the end, or their Terminal command will be "defaults write com.apple.screencapture locationFOLDER". I realise that the text on the article does have the space at the end, but a non-expert won't know that it's meant to be there unless you point it out to them.
Score: 7 Votes (Like | Disagree)
arn Avatar
78 months ago
article's been updated. Though the real trick is getting a screenshot of the screenshot options. ;)
Score: 5 Votes (Like | Disagree)
55 months ago

Don't work for Monterey.
a quick search should help you answer your question. I think you will find this works:

Change where screenshots are saved Mac
[LIST=1]
* Press Command-Shift-5 to open the Screenshot app.
* Select Options.
* From the Save to section, select your preferred location.
* If you select Other Location, you can choose a different folder of choice or create a new folder.

Select the one you like, and it persists, I never use the screen shot app myself, just the keyboard shortcuts. Most times I use the copy to clipboard option and paste it immediately.

Despite what some have said in this thread, you can deflect the show floating thumbnail option and the thumbnail does not show with the screenshot being immediately saved.


Attachment Image
Score: 3 Votes (Like | Disagree)
arn Avatar
78 months ago

More importantly though, is it possible to save screenshots immediately? I HATE when I take a screenshot and must wait for it to disappear from the bottom right and appear onto the desktop. Yes I know I can drag it but sometimes that ends up opening it by mistake due to double clicking the thumbnail on the bottom right. Can't you make it instant "like in the old days?"
MacRumors content image

In the same Command-Shift-5 Options pop up. Uncheck "Show Floating Thumbnail" -- but I still feel like it takes too long to appear.

arn
Score: 3 Votes (Like | Disagree)
TJ82 Avatar
78 months ago
Awfully convoluted.

Makes us Mac users look like neanderthals.
Score: 3 Votes (Like | Disagree)

Popular Stories

Aston Martin CarPlay Ultra Screen

Apple Says CarPlay Ultra is Coming to These Vehicle Brands

Thursday May 21, 2026 11:53 am PDT by
Last year, Apple launched CarPlay Ultra, the long-awaited next-generation version of its CarPlay software system for vehicles. Nearly a year later, CarPlay Ultra is still limited to Aston Martin's latest luxury vehicles, but that should change fairly soon. In May 2025, Apple said many other vehicle brands planned to offer CarPlay Ultra, including Hyundai, Kia, and Genesis. CarPlay Ultra...
iphone 18 pro blue%402x

iPhone 18 Pro: Dark Cherry, Light Blue, and Dark Gray Chassis Leaked [Update]

Thursday June 4, 2026 5:18 am PDT by
Update: Since publication, new information has come to light suggesting the images have been AI-manipulated and are not in fact iPhone 18 Pro chassis parts. The original article follows. The color options Apple is reportedly planning for the upcoming iPhone 18 Pro and ‌iPhone 18 Pro‌ Max have appeared online today in the form of images of chassis parts of unknown authenticity....
iOS 27 All the New App Features

iOS 27: All the Rumored App Features

Wednesday June 3, 2026 3:48 pm PDT by
Siri is getting a major overhaul in iOS 27, but Apple also has some big updates planned for apps like Camera, Photos, and Wallet. There are multiple new AI features in the works, plus some non-AI upgrades. Camera Apple is moving Visual Intelligence from the Camera Control button to the Camera app in iOS 27, according to Bloomberg. There will be a Siri mode that will be available alongside...