If you make a big change to your iPhone or iPad, like installing beta software or a major new version of Apple's operating system, it's essential that you make an archived backup, otherwise you won't be able to downgrade and revert to your device's previous state if things go wrong.
By creating an archived backup, you have a saved copy of the existing operating system, along with all your settings and data, to fall back on and reinstall, should the worst happen. An archived backup can also be encrypted, making your data securely protected on your computer. The following steps show you how it's done.
How to Make an Archived Backup
- Plug your iPhone or iPad into your Mac using the supplied cable.
- Allow the accessory to connect by clicking Allow in the dialog prompt.
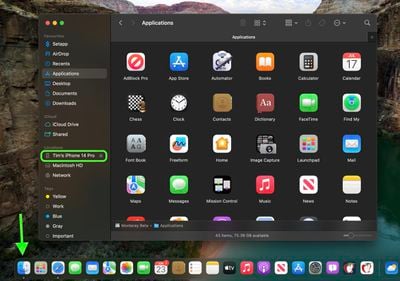
- Open a Finder window by clicking the Finder icon in the Dock.
- Click your iOS device's name in the sidebar.

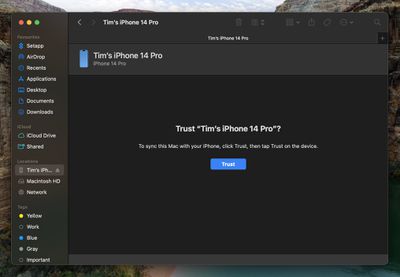
- If this is the first time connecting your device to your Mac, click Trust in the Finder window.
- Tap Trust on your device when prompted, then enter your passcode to confirm.
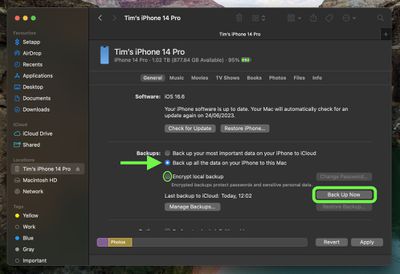
- In the General tab, click the circle next to where it says Back up all of the data on your [iPhone/iPad] to this Mac.
- If you want to encrypt the backup, check the box next to Encrypt local backup, then enter a password to protect your data.
- If you don't want to create an encrypted backup, or you've already set up encrypted backups, click Back Up Now.
When the backup is finished, you can find the date and time of the last backup in the General tab, just above the Manage Backups button. Remember that this backup will not be overwritten when you manually or automatically back up your iPhone or iPad in the future, so you can restore it at any time by using the Restore Backup... option in the same Finder screen.